Showing posts with label sewing. Show all posts

Friday, March 8, 2013

diy hearts.

Annapolis & COmpany | DIY Applique Tee
Annapolis & Company | DIY Applique
Hi schooners! I'm Mary Beth and I blog over at Annapolis & Company about our new life in the midwest. We're lovers of rainy days, starbucks coffee dates, weekend adventures, and anything stripy and nautical. I hope you'll come say hello!
Today we're talking DIY simple. Real simple. I am a novice seamstress, at best, and this was one of my first projects I ever did! There are several tutorials out there for this one, but I have included my method below using old J Crew sweaters for my coordinating fabric. I love the texture and cozy it adds to a basic concept. Want to make some of these darlings too???
What you'll need:
Annapolis & Company | DIY Applique
Plus...
// a sewing machine
// iron and ironing board
// and something hard you can iron on, like a piece of wood.
{Never used Heat n Bond before? You can find it here.}
Annapolis & Company | DIY Applique
Step One: Print out your image you are using for your appliqué, or free-hand one.
Step Two: Cut out your image.
Annapolis & Company | DIY Applique
Step Three: Cut your fabric to slightly larger than your image cut-out.
Step Four: Cut heat n' bond to the same shape as your fabric.
Step Five: Make sure you place your heat n' bond with the bumpy and glossy side facing up and backing your fabric. {This is the side that, when heated, will make it adhere to your fabric.}
Annapolis & Company | DIY Applique
Step Six: Iron your fabric to the heat n' bond on a low heat setting, on top of a hard surface, such as a piece of wood {as shown here}. You want it to be completely bonded to the fabric.
Annapolis & Company | DIY Applique
Step Seven: Trace your image to the back of your fabric, wrong side facing you, if you are using an image where direction matters.
Step Eight: Cut out your image now.
Step Nine: Peel the backing of the heat n bond away from your fabric. There should be left a glossy surface on your fabric.
Annapolis & Company | DIY Applique
Step Ten: Arrange the placement of your appliqués onto your article of clothing.
Annapolis & Company | DIY Applique
Step Eleven: Run a top stitch around your appliqué. I keep my machine on the slowest setting it will go, so that my stitching can be as accurately close to the edge of my appliqué as possible. I also love my triple stitch setting on my machine, which is the stitch shown above. Looks professional and gives instant texture! And I used a zig zag stitch for this J. Crew, chunky, sweater material below...
Annapolis & Company | DIY Applique
Simply adorable, no?
Want to see more DIY's, family friendly recipes, and some schooner tales thrown in? Come visit our family at Annapolis & Company!

Saturday, January 19, 2013

embroidery love.

Hi! My name is Emily. My husband, Zac, and I started CoupleJones.com. We are so excited to visit A Little Artsy today! We have been married for almost 10 years and have 3 crazy little girls. We both love design and art - he is a designer and I am a stay at home mom who loves photography, sewing, and random crafts that I get a bee in my bonnet about trying. This is my take on embroidery -
IMG_7151
Several years ago, we moved from our first teeny little house. For a little over 3 months after, we had to rent while we waited for our new home to be built. We wanted to save as much money as possible so we rented a one bedroom apartment - it was us and our two year old and as much stuff as wouldn't fit in our cheap storage unit squeezed into a VERY small space and the sewing machine did not make the cut. So I decided to try embroidery for the first time.
That doesn't mean I researched the correct way to do it or anything...that's not really my style. I just sat down and tried it. I probably still don't know the "right" way to do it but it's an easy enough thing to sit down and experiment with and get going. Let's just call my method, Embroidery for Slackers :)
IMG_7184
Our kids are hilarious (in our humble opinion) and I've been trying to find fun ways to memorialize the funny things they say. My Middlest came up with a JEWEL a few weeks ago that STILL makes me laugh when I think about it...and so I thought "embroider it", OBVIOUSLY- duh.
Sorry if the word "toot" is offensive. I think it's hilarious. My Oldest was teaching the Middlest to play "Rock, paper, scissors, shoot" and our middle girl got so excited to be playing that she got a little mixed up and yelled "Rock! Paper! Snickers! Toot!" and HILARITY ensued. Ha! If you don't have kids around to say funny things, you can also use your favorite song lyrics or quotes.
IMG_7058
These are detail pictures of the quilt I was working on when we were in that little apartment. I drew some of our daughter's favorite book characters and then embroidered them and used them as quilt squares for her big girl quilt when we moved her from her crib. It is so fun, I am so glad I tried it! QuiltcollageThis is a really easy thing to pick up and try so I am including some close ups of the stitches I used on these two pieces. I also am giving away the light bulb pattern for free in case anyone wants to use it. Click over to our SHOP to download the Pdf and then simply place your fabric over the print out and trace.
This would be an easy pattern for a child to try out as well if anyone has elementary aged kiddos who are interested in learning to sew.
embroidery2
Couplejonesprojects3
Thanks for reading! I hope you give this a try if it looks like fun! Thank you so much, Casey, for having us! Em couplejones.com

Tuesday, January 8, 2013

DIY studded moccs

Hi! I'm Isobel, first time mama to little wild child named Holden and digital editor of Babiekins Magazine. I'm also the voice behind holdenonbaby, a lifestyle and style blog that follows my life with Holden and our style choices along the way.

Instead of always going out to buy new clothes for Holden, I love looking for ways to spruce up items he already owns. These moccasins have been a favorite of ours for a while now and the fact that the suede stretches as you wear them means that they have lasted a lot longer than any other pair of shoes in Holden's closet. Due to their almost everyday use for the past 6 months or so, they were starting to look a bit sad and tired so I decided to add a few studs to make them a little bit more fun. 

What you need:
What you do:
  • Decide where you want to place the studs on the shoe
  • Use a hot glue gun to put glue on the back of the stud
  • Press the stud onto the shoe and hold for 5-10 seconds
  • Enjoy your brand new studded shoes!!
I love how they turned out! What do you think?


Thursday, June 23, 2011

Bath Towel Rug Tutorial


 Bath Towel Rug Tutorial
by Ashley Howry
I love this project not only because it's cheap and you can use what you have but also because the possibilities are endless!
And not to mention it's easy to throw in the wash!
Because let's face it...bathrooms are gross. 
I like to wash my rugs a couple times a week.
 I find that if you wash your big, fluffy rugs a couple of times a week they begin to look like a matted sheep.
 Not cool.

Now...on to the tutorial!
Trust me...it's very easy... very forgiving...and the possibilities are endless!

SUPPLIES
*Bath Towel - you can use any size you want. 
I chose a regular sized towel because I wanted a rug that covered a lot of my bathroom floor.
  You definitely could also use a hand towel if you are wanting a smaller rug!
*Fabric Scraps
*Sewing Machine

INSTRUCTIONS

First start by figuring out what you want the top of your rug to look like.
I had enough fabric scraps to make long strips.
You could also just make it really simple and make four rectangles to cover the top.
Once you have figured out how you want the top to be, cut your fabric!
Make sure that the sides of your fabric hang over the long edges of the towel by about two inches.


Sew your strips together (NOT to your towel yet)
You will end up with all of your fabric sewn into a top piece.


This next step is VERY important.  Trust me... I didn't do it the first time ;)
Pin the fabric layer on top of your towel. 
Use lots and lots of pins. 
You don't want your fabric to slide around while sewing.
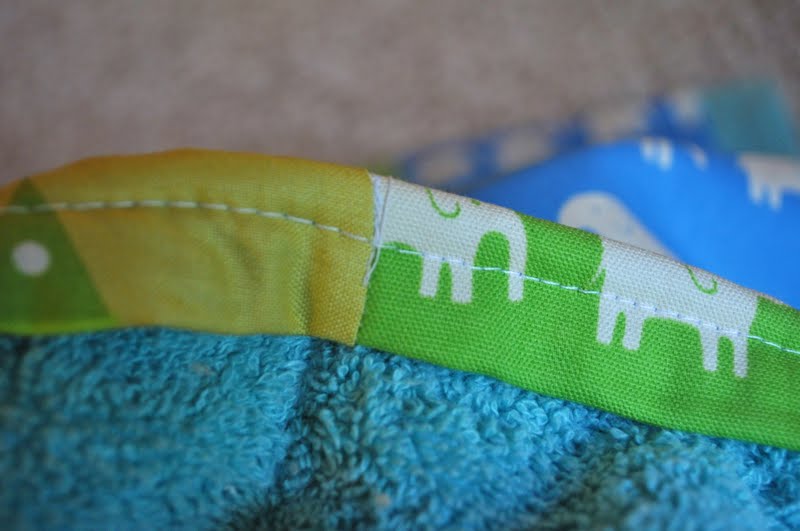
Now you will "stitch in the ditch." 
Basically this means to sew along any seams that you have made.
For instance: below I stitced the line right between both fabrics.
This will secure it to your towel.


Your top piece should be attached to your towel now.
The last step is to finish up the sides!
Remember how I told you to leave two inches of fabric hanging over?
You will take those two inches and fold them over once and then fold it one last time.
This will give you a nice finished edge. Sew right along the edge. 
Doing so will finish the edge of your rug!
Here's the back of the rug below.


Here's the good news... it doesnt have to be perfect.
As you can see below mine isn't.
But that's okay by me because it was free, a fun project and it serves it's purpose perfectly!


If you have any questions please ask!!!
Have a great day friends!

Wednesday, June 22, 2011

DIY: ruffle necklace

DIY: ruffle necklace by DANIELLE BURKLEO

i am so excited to share my first ever DIY that involves a needle and thread. it is actually the first time i ever even attempted to stitch (or sew??)… i don't even know the correct term i should be using for this tutorial. how bout that. that is how educated i am in all things needles and thread.


my friend kate asked me to be a part of her ruffled up series and i could not turn down the offer. it was a challenge i was nervous to take on, so all the more reason to do it.

Photobucket
supplies: felt or fabric, necklace chain, needle, thread, and scissors.

i used a bamboo blend hot pink felt because i am obsessed with it and it is so super soft. i ended up making another ruffle necklace out of fabric shortly afterward because i was so smitten with the first.

Photobucket
step 1: cut a piece of your felt about 4.5 inches by 12 inches and fold it in half. i totally just made those measurements up from eyeballing my necklace. bad blogger who is occasionally crafty, i know.

Photobucket
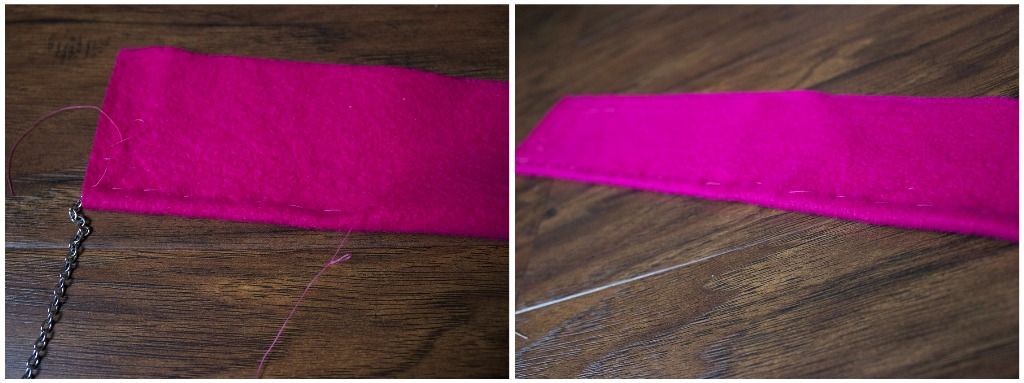
step 2: place your chain in the middle of your felt at the fold.

step 3: thread your needle. i took me 33 times to even get the thread through the eye of the needle, which i was calling the loop, until my mom informed me it was, in fact, called the eye. try to beat 33, i dare you.

Photobucket

step 5: stitch (sew?) underneath the chain, through both layers of felt, leaving thread at the beginning and end of felt for gathering.

step 6: pull thread at both ends to get your ruffle ruffled just as you'd like.

Photobucket
step 7: tie knots at each end and trim off extra thread.

step 8: put on your pretty new ruffles and smile.

Photobucket